Thursday, August 22, 2013

Zoya Satins Collection Swatches

I LOVE getting new nail polish but I HATE swatching it!  It's so boring and all I want to do is create something interesting by stamping it, bejeweling it, dotting it, and/or sponging it.  I try to be a good little nail blogger, but it's always my creative side that is itching to come out.  What I'm saying is don't count on me for swatching the latest collections in the future... :-)

That being said I am so in love with the Zoya Fall 2013 Satins Collection!  All of the colors are so regal and beautifully saturated and the collection comes with a glitter top coat!  Seriously, what more could a girl want?


First up is Neve, a deep shimmery royal blue.  I've mentioned several times before that I'm not a big fan of blue, but this one is a definite exception.  Two coats.  Below I am showing Neve with one coat of Maria Luisa, which is a copper-gold top coat.


Next is Mason, a to-die-for bright shimmery magenta.  I am showing two coats here.  Unfortunately, this color had trouble self-leveling as you can see from the photos.  Below I am showing Mason with one coat of Maria Luisa dabbed on top.


Next is Claudine, which is a dark shimmery charcoal with the slightest hint of green.  The formula is flawless and goes on smooth as glass!  Below I am showing Claudine topped with one coat of Maria Luisa brushed over the top.


Next is Channing, a bright coppery orange.  I love the color of this one, but like Mason it had a hard time self-leveling and it went on fairly streaky.  Despite that I was able to get good coverage with two coats.  Below I am showing Channing topped with one coat of Maria Luisa dabbed on.


Last, but certainly not least is Giovanna, a deep shimmery teal green.  I was so enthralled with this color that I was unable to stop myself from adding embellishments before I had taken photos of Giovanna alone.  

For this look I started out with two coats of Giovanna on each nail.  I dabbed one coat of Maria Luisa on my pinky and stamped my index and middle fingers using Cheeky plate CH37 with Color Club Angel's Kiss.  To finish it off I placed two small metal studs on both my ring finger and thumb.


What do you think of the Zoya Satins collection?  What color is your favorite?

Thanks for reading.  Toodles!

Saturday, August 10, 2013

Color Club Holographic and Water Slide Decals!

I have two exciting new things to share with my readers today - holographic polish and water slide decals!

I've seen holographic polish all over the internets lately but the allure of it was lost on me.  However I am never deterred by personal disdain - as any good nail-polish-addict I decided to give it a try anyway and well...I'm sold!  It is so beautiful and dimensional on my nails and the holographic polish gives off an amazing rainbow sparkle when in the sun.  Goodness knows we have enough of that here in New Mexico!

The next exciting news is that I decided to give water decals a try.  Not just any decals, but decals that I printed here at home!  You can buy water decals in myriad designs online, however the only ones I found online that I liked ship from Hong Kong - who has that kind of patience?  Especially when you can order your own water slide decal paper on Amazon and have it in two days?

So I poked around on Google Images, found some designs that I liked, threw them into Illustrator and printed up a sheet of water slide decals.  It really is that easy!  The only thing I didn't know until I received the paper is that you need to use a fixative spray when using an ink jet printer.  Thankfully I didn't have to make an emergency run to Hobby Lobby as I had some fixative spray on hand!

Have I blathered on enough?  Are you ready to see the pictures already?


The holographic polish is Color Club Kismet, which required three coats to achieve the opacity you see here.  What do you think of the paisley water decals?  They turned out a bit more translucent than I was expecting, but overall I am thrilled with the results!


If you would like a water slide decal tutorial let me know and I will get to work on it.

Thanks for reading.  Toodles!

Saturday, August 3, 2013

Grayscale - White to Black Gradient with Flower Stamp

I'm back!  The last week-and-a-half has been busy; filled with lots of family time and LOTS of driving.  On July 23rd I began the journey back to my home in North Dakota.  It was so great to see my kitties, sister-in-law, nieces and nephews.  We did find some time to have fun, but I spent most of my time getting settled into my new home, which I moved into a few months ago. 

This past Wednesday I journeyed (by 'journeyed' I mean drove the 1,100-something miles) back to New Mexico to be with my mom for her impending shoulder surgery.  We have a little time before she goes under the knife so I thought I would take the time to share with you all a manicure I did while in North Dakota.


From thumb to pinky I used the following polishes for the white to black gradient: Essie Blanc, OPI Moon Over Mumbai, Zoya Dove, Zoya Kelly, and Essie Licorice.  I then stamped each finger with Bundle Monster stamping plate BM02 using Konad special polish in black and white.


Hopefully I will be able to post more frequently now that I am getting settled back in here.

Thanks for reading.  Toodles

Friday, July 19, 2013

Neon Polka Dots

The neon nail polish trend reminds me of when I was a child and neon Crayons were all the rage.  I remember hoarding the coveted neon Crayons and spending time looking at my collection with great pride.  Now that I have matured beyond a Crayon collection and moved onto a massive nail polish collection I am still reminded of those wonderfully waxy colors, although Essie surely has managed to achieve much more saturated colors.


I started out with three coats of Essie DJ Play That Song from the Neons 2013 collection.  This luscious magenta goes on a bit streaky, but offers full coverage with three coats.  Interestingly it dries to a satin finish - I'm curious to see if the rest of the collection is the same.  I did, however, top it with a generous coat of Essie Good To Go top coat.  

On my ring finger I used two coats of Essie The More the Merrier from the Naughty Nautical collection.  Two coats shown.  I then used a tooth pick to add polka dots to my ring finger and thumb.


What do you think of the neon polishes?

Thanks for reading.  Toodles!

Tuesday, July 16, 2013

DIY Aztec Nail Wraps Tutorial!

I can't count the number of times I have seen a new nail technique online and thought, "Why didn't I come up with that?"  Moments of brilliance are rare, but I am proud to announce that I had such a moment a few days ago!

Here's the result of my light bulb moment:


***Disclaimer: this manicure is not up to my standards, however I am one of those people that lacks patience.  I was so excited to post this tutorial that I decided to put my perfectionism aside this time.***
Before I get into the tutorial let's first back track a bit...  The Aztec nail trend has been a frustrating one for me.  I have tried numerous times to free hand the intricate designs.  I've tried using striping tape, scotch tape, striping brushes, and toothpicks, only to create an embarrassingly messy manicure that I wouldn't even show to my best friend. 

Since I've been in New Mexico without all of my fancy nail art supplies I've had to be creative with what I do have AND I've had the opportunity to try out some techniques using household items that I was always too busy to try.  One such technique is do-it-yourself nail decals, created using a Ziploc bag and nail polish.  This tutorial on Gnarly Gnails is a great step-by-step post on creating your own nails decals, the only difference is that she uses wax paper instead of plastic.

My next thought on how to create an Aztec manicure was to paint my nails with a base coat and create a collage using small pieces of dried polish which I would adhere to my nails using a touch of polish.  This technique was a step in the right direction, but I was still dissatisfied with the results.

And then it hit me!  Why not create my own nail wraps?  I would have the ability to use both of my hands to create them, I wouldn't have to worry about messing up wet polish, and my lack of ambidextrousness wouldn't be an issue!  Light bulb moment!

Supplies:
- nail polish (duh!)
- Ziploc or comparable bag.
- fine tip Sharpie
- Scotch tape
- X-acto knife
- tweezers

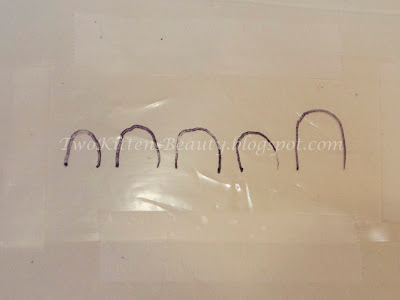
1) Wrap the Ziplock bag around each finger and trace the cuticle of each nail.  This will give you guide lines for creating the correct shape, width, and length wrap for each nail.  Cut out the set of guides and tape down to a flat surface with the side you drew on down,
being careful to pull out any large wrinkles in the plastic.


2) Paint 2-3 coats of your base coat onto the plastic.  Stay within the lines on the top and sides but paint a bit extra at the end to allow for extra length.


3) Paint squares of polish onto a different piece of Ziploc bag.  Allow ample drying time.  Peel from plastic.  (In order to save time this can be done up to 36 hours beforehand.)


4) Cut shapes out of the squares of polish and place them onto each nail wrap in the desired location.  (When I did this the base coat was still a bit tacky, therefore I was able to place each piece without the need for wet polish to act as a bonder.)  Once all of your shapes have been placed paint each wrap with a thin layer of quick drying top coat.


5) Once the top coat has dried use a fine point Sharpie to draw your black lines and dots.


6) Now comes the fun part!  Peel up your nails wraps and think, "Holy sh**!  It worked!"


7) To apply paint a thin layer of base coat onto a nail and press the corresponding wrap onto your nail.  Use a file to remove excess length and top with a coat of quick dry top coat.


I still think my Aztec nails need a bit of work, but they are certainly better than any other attempt I've made, and considering this is my first attempt at creating my own nail wraps I am super pleased with the way they turned out.  What do you think?

Thanks for reading.  Toodles!


Thursday, July 11, 2013

Cascade of Colors

I have been super anxious to post this mani, but I made myself wait until my camera arrived - and it finally did!  

Several days ago I saw a mani on the subreddit, RedditLaqueristas, and decided to give it a try using one of my favorite color palettes, purple and green.


I started out by painting each nail with two coats of Illumasqua Poke, which is a bright purple shimmer.  Poke is a beautiful color and goes on easily, giving full coverage in two thin coats.  I then laid down overlapping single strokes of the following Essie colors: First Timer, In The Cab-Ana, No More Film, and DJ Play That Song. 


This mani is going on day three so you can see a bit of wear at the tips of my nails, but I am SO happy with the way it turned out.  I don't want to take it off yet I am very excited to try this technique using a different color combination.

What do you think of this technique?  What colors would you like to see it done in?

Thanks for reading.  Toodles!

Monday, July 8, 2013

Racing Stripes with the late Nails Inc. Beaded Polish

When I saw that Nails Inc. had come out with a Beaded Polish line I had to try it for myself.  What is beaded polish?  I had to know.  I quickly found out that it is another textured matte polish, but this one sure isn't shy with the texture!  When I first tried it it went on a bit clumpy-McClumperson, but my second attempt was much more successful.

(My camera is on its way to me.  Hooray for this being the last cell pic I have to subject you to!  That is, unless I get too anxious about posting a manicure I have brewing in my head using two Illamasque polishes.)

I started this look with two coats of Essie Madison Ave-Hue.  This Barbie pink has a very subtle shimmer to it, just like The Girls Are Out, which I showed in my last post.  I then painted my ring finger with two coats of Nails Inc. Covent Garden.  I sealed all of the pink with my favorite top coat Essie Good To Go.  Once those had dried... (OH NO!!! I just dropped the Nails Inc. polish on my parent's floor and it broke all over their beautiful brick floor and woven rug.  I think the rug is going to survive better than the floor, which now has blue glitter in all of the nooks and crannys.  :-(  Not to mention I no longer have this awesome polish in my arsenal...oh well.  Thankfully, my mom is still doped up enough from her accident that she doesn't seem too concerned.)

Now, where were we?  Oh yes, I painted two coats of Nails Inc. Covent Garden on my ring finger and used Scotch tape to tape off stripes and slanted tips on the remainder of my fingers. 

Well now I'm just bummed out.  I must go paint my nails to get over the angst of losing one of my beloved polishes.  

R.I.P Nails Inc. Covent Garden.  You will be missed.

Thanks for reading.  Toodles!

Friday, July 5, 2013

They're Gray...!

Before I get into the polishes I used what do you think of my new nail shape?  I've seen that almond shaped nails are the new trend, one that had me a bit horrified.  I've seen some that are very long and to me look scary.  I had my hair cut the other day and sneaked a few peeks at my stylist's nails.  Her's were definitely almond shaped but not too long and I was surprised by how much I liked them.  In a moment of boredom I grabbed a file and got to work on mine.  Before I painted them I was a bit freaked out and thought, "Oh no, what have I done?"  But once painted it was love at first sight!


On my thumb and pinky finger I used two coats of Essie The Girls Are Out, which is a deep saturated magenta-pink with a very fine and subtle silver glitter.  The color of The Girls Are Out is not showing accurately in this cell phone photo, just envision it a deeper more purpley-pink.  Side bar:  hopefully I'll have my camera next week.  It's in a pile of things my fiance is going to bring to me in New Mexico when he comes out next week.  Yay!

My ring finger is painted with three coats of Revlon Scandalous, a black jelly with lots of magenta glitter.  Divine!  My index and middle fingers are painted with three thin coats of China Glaze Pelican Gray.  Finally, I used a striping brush to paint three stripes on each nail with The Girls Are Out.

Hopefully, I'll be able to post a bit more as my mom continues to recover and needs less assistance from me.  I didn't bring a huge selection of polishes with me, but I'll try to keep my ideas fresh anyhow.

Thanks for reading.  Toodles!


Tuesday, July 2, 2013

New Mexico Rain Clouds

I am still in New Mexico helping my mother while she recovers from her accident.  She continues to make extraordinary progress and her bruises and lacerations look better every day. 

New Mexico is in the middle of a dreadful drought - we need rain so badly.  I can see in my parents' backyard how parched the soil is and the danger of wild fires is extremely high.  The last few afternoons we have been blessed with sprinkles of rain - just enough to spot the flagstone.  It's not much, but it is a promising sign that the heavens are trying to open up on us, it's just too dry to squeeze the clouds of more than a few drops.  Every time it sprinkles I go outside and dance in the blessed drops and thank the clouds for giving what they can and hope they can give more the next day.

While in the shower yesterday I had an idea for a new technique that involved my mother's set of twenty (yes, 20) squiggly scissors. I tested several of the shapes and decided upon the one called Adobe...how very appropriate (I sit in a home constructed of adobes my parents made with their own hands).


I started out by painting each nail with two coats of OPI Lucky Lucky Lavender (light purple).  While that was drying I placed a piece of painter's tape onto wax paper.  I then cut the tape and wax paper into strips with the squiggly scissors.  Next, I cut each strip into nails sized pieces - you can see one in the photo below.

I removed the cut painter's tape from the wax paper backing and carefully adhered it to the tip of my nail and painted the remainder of my nail with OPI Gargantuan Green Grape (baby blue).  I repeated this process but moved the painter's tape a bit further up my nail bed and painted the remainder of my nail with the final color, Essie No Moro Film (navy blue).  


Please excuse my infrequent posts and cell phone pictures while I remain in New Mexico.  My camera and lightbox were not on the priority list as I rushed out the door ten days ago.

Thanks for reading.  Toodles!

Wednesday, June 26, 2013

K.I.S.S.

Keep it Simple, Stupid...

I have been in New Mexico for the last four days to be with my mother while she recovers from a bad accident this past weekend.  Miraculously, she is going to be fine in time, how long that will be is yet to be seen...two weeks, four weeks, eight weeks... though already she has made remarkable progress.  She is a tough women who always takes life on with amazing courage and enthusiasm.  Her already exceptional progress is a testament to her ceaseless spirit, which never fails to impress and inspire me and others around her.

All of that being said, I am going to Keep it Simple while I am here helping my mother in her recovery.  Please accept this post as my entry into hiatus.  I promise I will be back - I will not forget about my readers and please don't forget about me.  I will be back!

I bid you adieu with this simple manicure.


OPI Lucky Lucky Lavendar, Nicole by OPI Inner Sparkle

Toodles!

Thursday, June 20, 2013

Tribal Nails

Earlier this week my sister-in-law requested a manicure with a feather and neutral colors.  Her request brought to mind the tribal manicures which are all the rage right now.  It took me several tries, but I finally came up with a design that I was really happy with.  And I found myself staring at her nails every time I saw her, so I decided to recreate it on my nails and share it with my lovely readers (sans feather).


I started out with two coats of Flower Go With The Flow-Er, then used a small detail brush and dotting tool with Zoya Wednesday and China Glaze Poetic.   I free-handed all of the line work, which is uber hard for me as I am afflicted with an unsteady hand and aging eyes.  The perfectionist in me loathes looking at the photos of this manicure, but this blog is not about perfection, it's about having a creative outlet and sharing it with the world.  Perfect lines be damned...


As you may have notices I have not posted much this week, it's for a good reason - I promise!  I have been swatching my little heart out and promise to post some super exciting glitter indie polish swatches tomorrow.

Thanks for reading.  Toodles!

Monday, June 17, 2013

60's Stripes

Lately I've been feeling as though I have polisher's block - it's not as though I lack any shortage of new colors or techniques to try, in fact I think that maybe my brain has been on overload as I am inundated daily with beautiful manicures created across the world.  But yesterday I vowed to break loose of the block and try something outside the box, which for me means no purple or pink...oh the horror!

In my quest for inspiration I came across a graphic from the 60s, which had the craziest of color combinations, something I normally would not touch with a ten-foot pole, but like I said, I needed to get out of my comfort zone.  And that I did!


For this look I started out with one generous coat of Zoya Jacqueline.  I then used a striping brush to paint random stripes on each nail using OPI Are We There Yet?, Essie Going Incognito, Zoya Zuza, and Zoya Goldie.  

Once the stripes had dried completely I laid striping tape in a diagonal pattern, perpendicular to the painted stripes, on each nail, and painted over the striping tape with Zoya Codie.  I removed the striping tape as I painted each nail - I don't allow the polish to dry at all before removing the striping tape because it is more likely to peel the polish away.

Happy Monday to my beautiful readers.  Toodles!

Friday, June 14, 2013

Bobbi Storm Skittlette

I had every intention of swatching all of the Zoya Irresistible collection for you, but swatching is time consuming and not nearly as fun as creating fun nail designs.  

Now that I'm finished making excuses I am going to show you the first manicure I created using the Irresistible collection.


I started out with two coats of Zoya Storm on my thumb and pinky fingers.  I then used a dotting tool to create large white dots on which I placed magenta rhinestones.  My index, middle, and ring fingers are polished with two coats of Zoya Bobbi.  In the bottle Bobbi looks like a deep pink that is washed out by lots of silver micro foil, however it goes on as a beautiful deep, saturated metallic magenta.  In other words it is gorgeous!

I topped my index and middle fingers with two coats of China Glaze Whirled Away.  This confetti top coat is tricky to use.  The large white pieces require a bit of fishing and the other shapes are few and far between.  I wish there were more of the small and bar confetti.  My ring finger I stamped with Konad White special polish using stamping plate Bundle Monster BM12.


Thanks for reading.  Toodles!

Wednesday, June 12, 2013

Daisy Jelly Sandwich

Another nail trend that has been kicking around the nail blogs lately is the jelly sandwich.  What the heck is that, you ask?  My interpretation is to paint over glitter polish or a design using a transparent (i.e. jelly) or semi-transparent polish.  But blah, blah, blah...let's get to the best part - pictures!


For this jelly sandwich I started out with two coats of neutral polish, Zoya Avery.  I then stamped each finger using Cheeky stamping plate CH44 with Konad Black special polish.  After the stamp had ample time to dry I topped it with a generous coat of Zoya Paloma.


Like my last post I didn't take photos of this manicure until the end of day three, so you'll have to excuse the bit of tip-wear I am sporting.


Happy Hump Day!  Thanks for reading.

Toodles!

Monday, June 10, 2013

Candy Colored Jacks

Ever since I did the Half & Half manicure I have been loving the look of a vetical subdivision.  I attempted the half-look with a stamp back in March with moderate success.  Thankfully, my stamping skills are constantly improving, so I decided to give it another try.


I started out with two coats of Zoya Josie on my pinky and thumb, two coats of Essie Bobbing for Baubles on my index and middle fingers, and two coats of Zoya Micky on my ring finger.  Once that had completely dried I stamped each finger with Zoya Jacqueline using Cheeky stamping plate CH46.  

To give the stamps more pop I used a dotting tool to accent the jack ends.  And because I can never resist a little glitter I painted half of my index and middle fingers with China Glaze Fairy Dust.


I am really happy with how this manicure turned out and it wore really well.  These pictures were taken at the end of day three!

Thanks for reading.  Toodles!

Thursday, June 6, 2013

Hawaiian Luau

Does anyone remember how little I care for blue?  There are few exceptions to my dislike for blue, but this manicure is definitely one of them!


My thumb and ring fingers are polished with Essie Play Date and stamped using Konad special polish in White and Mash stamping plate Mash-44.  My index and middle fingers are painted with two coats of OPI Tiffany Case from the Bond Girls collection.  Finally, my pinky was painted with two coats of Flower Thistle or That, and topped with two coats of Hard Candy Tinsel TownTo finish off this look I topped my thumb, ring, and pinky fingers with one coat of Essie Matte About You.


I am totally obsessed with this manicure - I love everything about it.  What is your favorite color this summer?

Thanks for reading.  Toodles!